Monday, November 24, 2014

Fall Inspired by Hero Arts (Projects 31, 32, 33 and 34)

Only 16 more projects before I can lift the shopping moratorium.

I mentioned a couple of posts ago that I love going to the Hero Arts’ website for inspiration.  Well today's post is several cards I made that were inspired by Hero Arts cards.
 
Card 1

 
Let’s start with the inspiration piece Hero Arts Halloween Greetings which provided the inspiration for the layout and how I did the background.
For this piece, I started by stamping the acorn and leaves on a snippet of X-Press paper with Memento Rich Cocoa.  Then I colored them with Copics and fussy cut them out with my Fiskars fingertip craft knife. The image is by Inkadinkado. 
 
I don’t know about you, but white edges drive me batty when I fussy cut things out.  So I’ve got a tip for dealing with that.  After I cut the piece out, I place it on a piece of scrap paper and run a marker in the same/ similar color as the ink I stamped with along the piece.  Basically I trace the piece on the scrap paper.  That way the edges get colored.  Just be careful, I can’t tell you the number of times I slipped and add a line to the image.  Here are some before and after pictures.
Before
After


For the base, I took a piece of patterned paper and stamped with the background sentiment stamp by the Stampin Place with Versafine in Vintage Sepia and embossed with clear embossing powder.  I added the lace to the back of the piece and attached that to the kraft cardstock.
 
I used a Spellbinders die to cut out the piece for the sentiment.  The sentiment is by Impression Obsession and stamped with Versamagic in pumpkin spice. 
 
Copics:
Acorns -  E21, E23, E25, E27

Leaves - R05 & R08, Y15& Y17, YR04& YR18 


Card 2
 

With this one, I was inspired by the technique used on this really cool card.  Hero Arts Inchie Art

For this card, I took a three by three piece of cream cardstock and stamped it with the Inkadinkado flourish stamp with Versamark and heat embossed with clear powder.  Then I inked the piece with Distress Inks in Spiced Maramalde, Fired Brick and Wild Honey.  And wiped the ink off the embossed portions.  Then I cut the square into inchies (one inch square).  I took five of the inchies and added stamped images and the sentiment.  I added the squares to a kraft base.  Then I added the orange ribbon from August’s ribbon club assortment from Really Reasonable Ribbons.  I made the bow using my bow-it-all and added it with a glue dot.
 
The stamps used are:

butterflies – Stampendous

Acorn  - Fiskar

Big leaf – Fiskars

Small Leaf  – Stampendous

Fall –  Stampendous
 
Card 3
This card is my version of an absolutely beautiful card made by Jennifer McGuire. Jennifer McGuire Get WellYou will notice that my piece is strikingly similar.  I used different stamps and different techniques but I just loved Jennifer’s piece, and as they say, imitation is the sincerest form of flattery.  Because it is so similar to Jennifer’s piece, I wasn’t going to post it but, I really like how the butterfly came out.  So I decided to share it.


To create this card, I started with two pieces of watercolor paper.  For the card base, I brayered on Distress Ink in fired brick.  Because the paper has some texture and I used the brayer to apply the ink, it created a cool effect.  I think I misted the brayer with a little water to get better coverage.  For the smaller piece, I used Spiced Marmalade and did the same thing.  I stamped both pieces with Inkadinkado flourish stamps with Memento Rich Cocoa ink.  After stamping, I used my corner rounder on the smaller piece. 
 

I inked a scrap of watercolor paper with DI in Fired Brick for the sentiment, stamped it with DI in Vintage Photo and dovetailed the ends.  I inked the edges with Vintage Photo as well.  When I attached it to the smaller piece, I put a foam square in the center and then used adhesive on the ends to glue them down. 


For the butterfly, I stamped the butterfly with Versafine in Onyx Black and embossed with clear embossing powder.  Then I painted the butterfly with twinkle H2Os. 
Once assembled, I added liquid pearls in Cantaloupe and Rogue.  To get them to flatten, I applied a couple of dots at a time and then thwapped (yes, I just made up that word) the card against my craft desk.  Basically, I tapped, with some force, the back of the card against my desk until I liked the look of the dots.  I figured out that given the heat in Florida, the liquid pearls start to set up fairly quickly.  So I had to apply the dots in batches or the thwapping wouldn’t work. 
 
 
Card 4
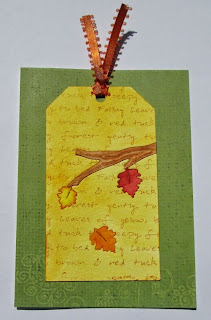
For this card, I finally gave die cut inlay a try.  I was inspired by this card: :Hero Arts Thank You Flower Branch.


I started by cutting the tag shape with my silhouette from watercolor paper and from plain cardstock.  I actually made a few of these because I donated several to Operation Write Home.   So for the first one, I cut the branch from the watercolor paper tag first and then the leaves.  But that meant when I cut the leaf that’s dangling off the branch, I didn’t get the full leaf.  So I had to re-cut it from a snippet of watercolor paper.  For the rest of the tags I made, I used the branch die to figure out the placement of the leaf, but cut the leaves first.  Hopefully that makes sense.   Then I ran the branch and leaves through my Big Kick again to emboss them.
 
I inked the background with Distress Ink in Mustard Seed.  Then I stamped the background sentiment by the Stampin Place with Tea Dye Distress Ink (I think).  I colored the branch with Tea Dye and Vintage Photo Distress Ink.   The leaves were colored with Spiced Marmalade, Squeezed Lemon, Fired Brick and Barn Door.
I then attached the watercolor paper tag to the plain cardstock.   Then I placed the branch and leaves back into the tag.   To finish it off, I added some ribbon from my stash, pattern paper to the card base and the tag on top.

I'm going to enter these over at Pixie's Snippets Playground - Week 152
 
Thanks for stopping by and please come again.


Tuesday, November 11, 2014

The Last of the Halloween Cards (Projects 25, 26, 27, 28, 29, 30)

Woo Hoo!!! I'm more than half way to my goal of 50 cards.  I'm really going to have to get moving with posting if I want to meet my goal in time to do some crafty shopping on Black Friday.


The Raven

 
The image is a stamp by Stampendous.  I colored it with Distress Inks in Dusty Concord, Mustard Seed and Spiced Marmalade.   I then used Frantage (by Stampendous) embossing powder and mica chips, and some Martha Stewart glitter along the edge.  I’m not sure if I like how it came out.  I have a love-hate relationship with the Frantage embossing powders and elements.  I love the stuff I’ve seen it used on but I tend to hate how it turns out when I use it.  I think I just need to keep practicing with it.
 
Pumpkin Head Girl
 
This image is by Stampendous, stamped with Memento Tuxedo Black and colored with Copics.  I added stickles to her hat.  I inked the edges with Distress Ink in Dusty Concord.  I think it needs an embellishment but I can’t find one in my stash that I like how it looks with this.
 
Pumpkin Cat
 
This image is by Inkadinkado, stamped with Memento Tuxedo Black and Colored with Copics.  I added stickles to the collar.  I die cut the oval and the scallop oval mat with Spellbinder nesties dies.
Girl Dressed Like Pumpkin
 
The image is by Recollections and was RAKed to me after last year’s Stamptoberfest over at Two Peas.  She’s stamped with Memento Tuxedo Black and colored with Copics.  I added stickles to her tights and the three corners.  The candy corn circle and mat were cut with Spellbinder nestites dies.  The candy corn is from the same stamp set as the girl.  After coloring them, I added glossy accents for some shine and dimension.  The background was made by repeatedly stamping on the diagonal a long sentiment stamp by Stampendous.  It is about 5 inches long. 
 
 
Witch

The image is from the same set as the girl dressed like a pumpkin by Recollections, stamped with Memento Tuxedo Black and colored with Copics.  I got a drip of ink on the top corner, so I covered it with the enamel pumpkin sticker.  The bow was made with my bow easy.  The sentiment is by Studio G.   
Owl

This is another fairly new stamp, by Outliners/ Hampton Art.  I stamped it with Memento Tuxedo Black and colored with Copics.  I added liquid pearls to the hat, stickles to the spider’s thread, metallic pen to the buckle and Wink of Stella to the flower.  I created the bow with my bow-it-all.  I love that thing.
 
Copic List:
Pumpkin Head Girl:
Head & Body – YR15, YR16, YR12, Y02
Clothes & hat – V12, V15, V17, YG06, YG09, YR15, YR16
Cat – C1, C3, C7, 100
 
Pumpkin Cat:
Pumpkin – YR02, YR04, YR07, Y08 (for the face)
Cat – YG01, YG03, YG06, G02, G05
 
Girl Dressed Like Pumpkin:
Pumpkin – YR02, YR04, YR07
Face – E00
Hair – E11, E17, E19
Arms & Legs – V15, G07
 
Witch: (I forgot to make a list of the colors I used, so this is my best guess)
Dress & Hat – YR02, YR04, YG03, V01, V04, V06
Hair – YG03, YG06
Face & Hands – E000, RV10
Pumpkin – YG02, YG04, YG07
 
Owl:
Body – V04, V09, Y38
Wings – YR07, YG03
Hat – YR02, YR07, YR09, YG01, YG03, YG06
Flower Stem – YG03, YG06
Pumpkin – YR04, YR07
Gourd – Y15, Y17, YG17
Flower – Y06, V04, V09, YR16, Y08, Y17
Spider – YG06
Stars – Y06
Leaves – E08, YG95, Y38, Y17, YR23, E79, YR07, E08, YR16, Y28, Y38, Yr23, Yr18, E09, YR68, R17, R08 (that’s quite a lot of colors for such small leaves).
 
Thanks for stopping by and please come again.


Wednesday, November 5, 2014

House Mouse Halloween (Projects 19, 20, 21, 22, 23, 24)

I know it is a little late for Halloween cards, but I didn't have a chance to post these before Halloween. 


I just love House Mouse stamps.  These cards (except for the very last one) were made using stamps from a set of clear stamps by The Paper Studio that I’ve had for years.  I just think all the little mice dressed up for Halloween are too cute.  There are also stamps with the mice dressed like a ghost, a bat, a vampire and a lobster.   All of the images were colored with Copics, and I will list the colors at the end of this post.
 
Caterpillar Mouse


For the bottom half, I stamped the sentiment and the candy corn using ColorBox ink.  The “candy” and the solid candy corn are by Studio G and the outlined candy corn are by Recollection.  The mouse prints are from the same stamps set as the mouse.  I used the wavy blade for my paper trimmer to cut the mat for the mouse and the mouse prints.  Finally, I added some stickles to his antenna. 
 
 
Pumpkin Mouse
 
The orange strip is stamped with pumpkin baskets from the same set using Versamark ink.  They are really hard to see.  The sentiment is by The Paper Studio (I think).  The small rectangle of pp is the reverse of the pp that I used for the card base.
 
Carrot Mouse
 
For this one, I matted the image on an offset rectangle to do something different.  The ribbon is from my stash.  The sentiment is by Studio G.  I used Ranger enamel accents in black to create the dots on either side of the sentiment.
 
Butterfly Mouse


The flowers was cut using my silhouette and colored with Distress Ink in Spiced Marmalade and I used buttons from my stash for the centers.
 
Cheese Mouse
 
For this card, I created a spinner card.  I used my silhouette to cut the rectangle in the center of the purple paper and in the card base.   Then I sandwiched twine between the image and the sentiment.


Then I sandwiched the ends of the twine between the purple paper and the card base so that the image is suspended in the whole in the card and will spin.


I added liquid pearl dots.  I didn’t like how the image looked against the white card bases, so I added a rectangle of green paper to the inside of the card.
 
Dino Mouse
 
This last card was made using a new stamp I got this year (pre-moratorium).  It is a cling stamp by Stampendous.  Since it is such a big image and I was sticking with a 4 x 5.5 card base, I kept this one fairly simple.
 
Copic list:
Caterpillar Mouse:
Caterpillar body: YG01, YG03, YG06
Mouse: E000, E93, E23
 
Pumpkin Mouse:
Pumpkin – YR02, YR04, YR07
Stem – YG67
Mouse – E000, E93, E23, RV10, RV13
Shadow – W5, W0
 
Carrot Mouse:
Carrot – YR12, YR15, YR16
Pumpkin – YR02, YR04, YR07, YR09, YR27
Mouse – W0, W5, E000, R20
Leaves – G02, G05, G07
Shadow – C1, C3
 
Butterfly Mouse:
Wings – Y11, YR15, YR16, YR18, YR00, E18, E79
Mouse – W0, W3, W5, E000, RV10
Pumpkin – YR15, YR16, YR18, G05
Shadow – C3
 
Cheese Mouse:
Pumpkin – YR02, YR04, YR07, YR09, YR27
Mouse – E000, E23, R20
Cheese – Y02, Y06, Y08, Y17
Shadow – C1, C3
  
Dino Mouse:
Dino – YG03, YG06, YG09, V01, V09
Candy Corn – Y08, YR07
Pumpkin – G05, YR04, YR07, YR18
Big Mouse – E09, E17, E23, E00, R20
Small Mouse – E23, E00, R20
Shadow – C3, C1, C0
 
Thanks for stopping by and please come again.


Tuesday, October 28, 2014

Inktoberfest Details (Projects 13, 14, 15, 16, 17, and 18)


Let’s start by welcoming Di and Liz, my two newest followers.  You should go check out their fabulous blogs: Pixie's Crafty Workshop and Crafty Sunflower.  Ms. Di is the wonderful hostess of the Pixie's Snippets Playground challenge.

I’m sorry it has been so long since I posted, especially since I promised more details for my last post.  The last couple of weeks have been crazy.  About 2 weeks ago, I had a conference to go to for work and before leaving I went on a cleaning bender because my husband, who I’m currently separated from, agreed to dog sit while I was at the conference.  Then when I got back, my parents had returned from their vacation and brought my aunt back with them.  So I spent some time with her.  Around the same time (the weekend of the 18th), I realized that I had agreed to have a table at the garage/ craft sale at my mom’s church this weekend but I did have anything made that I could sell.  So for the last week and a half, I’ve been working like crazy to get stuff made for the sale.  So my card making and blogging have been neglected.
 
On to the details from the Inktoberfest sneak peek:

My challenge sample:


This is the card I made for the challenge I hosted, called Starting Point.


 For the challenge, participants had to start their project by choosing 2 different embellishments and use them as the inspiration for the piece.  I started with the buttons, which are two buttons layered together, and the ribbon, which I used my bow-it-all to tie in a double bow.  They served as the guide for the colors I used for the rest of the piece. 
 
 
After coloring the angel image (Stampendous) with colored pencils, I stamped the image on a scrap paper and created a mask. I used Distress Inks (Dried Marigold and Spiced Maramalade) to ink around the image and then I used a firm bristled brush to flick Distress Stain in Chipped Sapphire on the piece.  I was being a bit lazy and didn’t do a close cut on the mask and when I got done inking, I did not like the ring of white around the angel.  So I went back in with a brush to ink the white area. 
    
The tag was inked with Distress Ink in Dried Marigold and Chipped Sapphire and splattered with Chipped Sapphire. The sentiment is by My Favorite Things.  I used a corner rounder on the angel and the tag.
 
A Master Board:
The master board was created for a challenge that required that you create a master board and use it to create at least two ATCs (artist trading cards).  I started by inking watercolor paper with Distress Inks in Broken China, Salty Ocean and Shaded Lilac.  I then wet the paper and sprinkled with salt to get the spotted effect.
 
Then I used a snowflake stencil I made with my silhouette and sprayed it with Shimmer Mist in Frost.  It is kinda hard to see.
 
Finally, I stamped the snowflakes with Distress Ink.  The stamps are by Impression Obsession and Inkadinkado.
 
Once done, I created two ATCs.  The snowman (Inkadinkado) is stamped with Brillance Ink and fussy cut and popped up on the ATC. I created the embellishment by die cutting a circle and stamping the sentiment (Studio G). I added some stickles. Once dry, I covered with glossy accents.  Then when that was dry, I popped it up in a bottle cap.


Combining 3 Challenges:


For this card, I combined three challenges: the Paper Towel challenge , the Lighten Up challenge and the Mixed Media challenge.  Check out the links for details on the requirements and techniques required for each challenge.
 
I created the side panel by using my Big and Juicy ink pad in Hydrangea to ink up a piece of paper towel and then stamp on paper with it using a brayer. I added some stickles to accent the swirl pattern of the paper towel.
 
For lighten up, I stamped the bubble image by the Stampin Place with Distress Ink in Broken China. The tree is by Hero Arts. I colored it with Copic and Spica markers. I added stickles to the branches of the tree but it doesn't show up very well in the picture and stickles for the ground. I added some snowflake stamps by Hero Arts and some stickles for snowflakes. The corner punch is by Fiskar.

 The mixed media pieces are the large snowflakes. I added a snowflake charm to the bottom one and a sequin and gem to the top one.  You should definitely check out the link for the mixed media challenge, which has a link to Sadie's wonderful blog post with detailed explanation of how to create the pieces.
 
Bookmark:

This one combined the Lighten Up challenge and the Book'em challenge.
 
I used watercolor paper as suggested by Heidi. It took me 3 tries to get the stamping right. The first try was too dark and on the second, the image didn't come out completely. The stamp is by Heidi Swapp and I used Spiced Marmalade Distress Ink.
 
 Then I stamped the squirrel and sentiment by Studio G. It is actually one stamp and I cut it apart. The sentiment is next to the acorn so it was too wide for the base. I stamped with Memento Ink in Rich Cocoa, but the squirrel didn't come out solid enough. So I used some reinker to fill him in with a paint brush. The acorns in the corners are by Inkadinkado.
I wanted to put a heart around the sentiment because in needed something. None of my heart stamps would work so I decided to draw it in. Unfortunately, I did it in pen and I hate it. So after taking this picture, I used a Spellbinder scallop heart to cut out the heart. Then I cut another heart , restamped the sentiment, and did an inlay.  Here's the redone book mark. 

I plan on putting it in my Mom's Christmas stocking because as I've previously mentioned, she's the crazy squirrel lady.
 
New Technique:

This is the card I created for the Shadow Knows challenge, which involved using a technique new to me.  The link has a more detailed explanation, but the idea is to make something stamped on dark cardstock with white ink stand out more by outlining it with a Versamarker.  


I stamped the turkey with Hero Arts Unicorn Pigment Ink.  Since I didn't have a Versamarker, I used my Zig Emboss Writer, which worked. I did the same with the sentiment. Both stamps are by Inkadinkado. Here's a close up where you can better see the outlining.


The base was made with Distress Inks in Spiced Maramalade, Mustard Seed, Barn Door, and Aged Mahosgany, I think. I made it awhile ago. I wet the paper and then sprinkled it with sea salt, which pulls out some of the ink and creates a spotting effect.  I used a Spellbinder die for the sentiment and added liquid pearls.
 
 
Mixed Media Fun:
 
I created a bunch of pieces for the mixed media challenge.  I really had fun with the technique. 
 
I decided I wanted to do something other than a square or circle.  So I pulled out my Spellbinder poinsettia and snowflake dies.  And I've got a pack of chipboard I bought at Michael's.  Well, that chipboard is a bit thick for a Spellbinder die.  So I had to pull out an Exacto knife for the poinsettias.  For the snowflakes, I pulled out a macaroni box from my recycling bin.  That worked much better.  And I used metallic acrylic inks to give the pieces some shine. 


I used the snowflake on the triple combo card above.  And here is what I did with the poinsettias:


I wanted the poinsettia to be the focus, so I kept the rest fairly simple. The background stamp is by Hero Arts. I stamped it with Versamark and embossed with clear embossing powder. I added a gold ribbon. Then I stacked the pieces of the die. I added liquid pearls in gold to the center.

I had so much fun with this technique on the die cuts that I decided to make some backgrounds with it. I decided to keep the image small so that the background could show.


 The image was stamped with Versamark and embossed with a green metallic embossing powder. I added stickles for the star and ornaments. Because I got embossing powder in spots I didn't want it and it left a mark when I wiped it off, I fussy cut the tree. The tree stamp is by the Stampin Place.

Thanks for stopping by and please come again.